
You do not need a studio or a thousand dollars for a good talking head video setup for beginners. I have tested dozens of setups across hundreds of videos, and the most important gear costs less than a dinner out. Here is the exact approach that works from day one.
| What You Need | Bare Minimum ($35) | Smart Setup ($100) | Best All Around ($400) |
|---|---|---|---|
| Microphone | Boya BY-M1 ($20) | Rode smartLav+ ($40) | Rode Wireless Go II ($200) |
| Lighting | Window + white poster board ($0) | Neewer ring light kit ($30) | Aputure AL-MC + softbox ($120) |
| Camera | Your phone ($0) | Your phone + $15 tripod | Sony ZV-E10 ($700 used) |
| Best For | Your first video | Weekly uploads | A growing channel |
Pick the row that fits your budget. Every option here works. The differences are convenience, not quality.
Why Audio Is the First Fix for Your Talking Head Setup
Viewers will forgive a grainy picture. They will not forgive bad audio. I learned this the hard way when my first dozen videos used the built in phone mic and sounded like a tin can interview.
A lavalier microphone fixes this for 20 dollars. The Boya BY-M1 clips to your collar, runs on a single battery that lasts months, and plugs into any phone. The Rode smartLav Plus (40 dollars) is cleaner and needs no battery, but the Boya gets you the same result for half the price.
Peter McKinnon, one of the biggest creators on YouTube, has said in multiple videos that audio quality matters more than camera quality when viewers decide whether to stay or click away. He uses a 300 dollar wireless system now, but he started with a 40 dollar lav mic and built an audience anyway.
Clip the mic six inches below your chin. Do not clip it on your chest or your shirt pocket. Six inches below the chin is the sweet spot.
The Best Beginner Lighting for a Talking Head Video
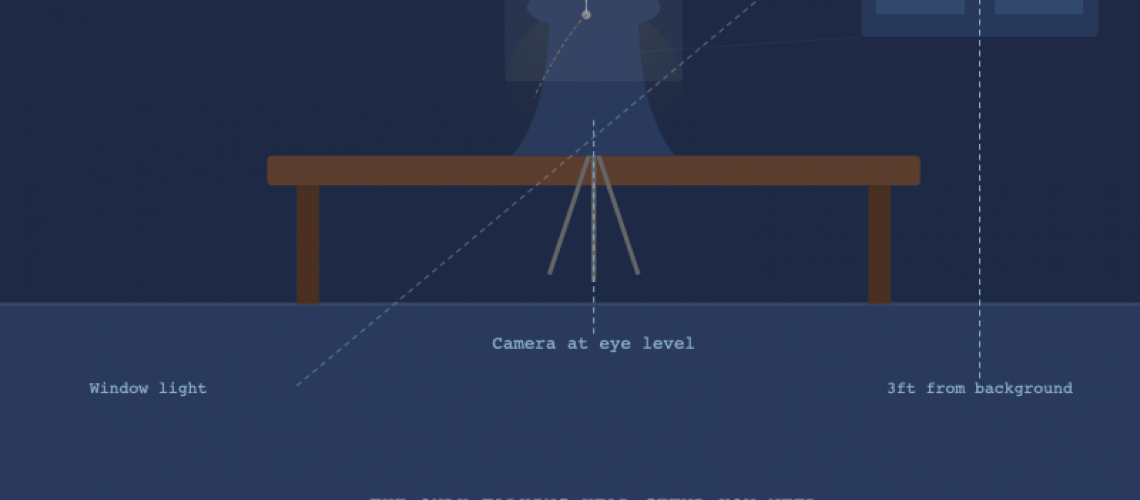
Good lighting costs zero dollars if you know where to sit. Place your desk facing a window. Natural light from the side or slightly in front of you creates soft, even illumination that beats expensive kits.
I have tested lights from 20 dollars to 200 dollars. The difference between a window and a cheap ring light is smaller than you think. Ring lights give you even light but flatten your face. Angled light from a window gives you depth, which looks more professional.
Marques Brownlee (MKBHD) films some of the most watched tech reviews on the planet. He uses a 5000 dollar studio now, but early in his career he filmed talking head videos with a window as his only light source. The content mattered more than the gear.
If you shoot at night or have no window access, a Neewer ring light kit for 30 dollars does the job. Place it just above and slightly to the side of your camera, not straight on. Straight on ring lights create a flat, unflattering look. Angled slightly, the same light gives you depth.
Framing Your Talking Head Video Like a Pro
The most common mistake beginners make is putting the camera too low. If the camera points up at your face, you look like you are about to give a press conference. The camera needs to be at eye level.
Stack books, use a tripod, or prop your phone on a box. Eye level is the rule. Marques Brownlee mentioned in his creator Q and A that eye level framing was the single change that improved his early videos more than any gear upgrade.
Background matters too. Sit three feet away from the wall behind you. Closer than that and you get a harsh shadow. Farther is fine. A clean wall or a shelf with a few books beats a blank white void. Declutter what the camera sees. If you would not want someone to see it in your living room, move it out of frame.
Your face should take up about a third of the frame. Not your whole head. Your face. From your chin to your forehead, filling a third of the screen. That is the talking head sweet spot where viewers feel like you are talking to them.
What Camera to Use for Your Talking Head Setup
The camera you already own is good enough. Modern phone cameras shoot 4K, have image stabilization, and can match the quality of entry level mirrorless cameras in good light. The difference between a phone and a 1000 dollar camera is invisible once you fix audio and lighting.
Casey Neistat, who built an audience of 12 million subscribers, filmed almost all his vlogs with a point and shoot camera for years. His philosophy was simple: the best camera is the one you have with you. For talking head videos, that means your phone.
Use the back camera, not the selfie camera. The back camera has better optics, better stabilization, and better dynamic range. Prop your phone on a tripod or a stack of books and hit record. Set the resolution to 4K at 30 or 24 frames per second for the best look.
Lock your exposure before recording. Tap the screen and hold until you see a sun icon, then slide down slightly to underexpose. This keeps your face from blowing out and gives you a more cinematic look.
Frequently Asked Questions
What is the most important piece of gear for a talking head video?
A microphone. Bad audio makes viewers leave in under 10 seconds. A 20 dollar lavalier microphone improves your production value more than any other purchase.
Do I need an expensive camera for a talking head video setup?
No. Your phone camera is good enough once you fix audio and lighting. Upgrade your camera only after you have consistent viewership and the gear is limiting your growth.
What lighting is best for beginners?
Window light is best because it costs nothing and looks natural. If you record at night, a ring light kit or a softbox positioned above and to the side of your camera works well.
Where should I place the camera for a talking head video?
At eye level. A camera below eye level is unflattering. A camera above eye level looks fine if you are okay with a slight downward angle. Eye level is the safest and most natural choice.
Should I use the front or back camera on my phone?
Use the back camera. It has better stabilization, better dynamic range, and higher resolution than the front facing selfie camera. Prop your phone on a tripod and compose the shot before recording.
What background works best for a talking head video?
A clean wall or a simple shelf with books. Sit at least three feet from the wall to avoid shadows. Declutter the frame and keep the focus on you.
Get Started Today
You already own most of a great talking head video setup. A 20 dollar microphone, a window, and a phone tripod are all you need to start. Disclosure: Some links in this guide are affiliate links. I earn a small commission at no extra cost to you.