
Your video comes out too dark no matter what you do, and you are not alone. I have pulled clips off a $3,000 camera that looked like a black void and others off a phone that looked gorgeous, and the difference was never the price tag. It was exposure, and once you understand that one idea, dark footage stops being a mystery and starts being a fix.
| Aspect | Key Takeaway |
|---|---|
| Root Cause | Dark video is underexposure: the sensor did not capture enough light |
| First Fix | Learn your histogram and zebras before you ever hit record |
| Free Move | Turn the subject toward available light instead of buying gear |
| Budget Gear | A ~$32 5-in-1 reflector bounces window light where you need it |
| Real Light | A ~$119 bi-color LED panel is the answer when natural light runs out |
| Post-Safety | DaVinci Resolve can lift footage, but you cannot fix what was never captured |
Why Is Your Video Too Dark? It Is Almost Always Underexposure
Your video too dark means the sensor simply did not record enough light, and that happens long before the file ever touches your editing timeline. Underexposure is not a style choice, it is a math problem: aperture, shutter speed, and ISO control how much light reaches the sensor, and when that trio lands short, you get dark footage.
Most beginners make the same mistake I made for years, they trust the camera’s auto exposure and never check what it decided. Auto mode reads a whole scene and tries to average it out, so a bright window or a white wall tricks the meter into underexposing your subject into silhouette.
I learned this the hard way on a run-and-gun client promo. The subject sat with a big window behind them, the camera metered for the daylight, and the face went almost black. That is the single most common cause of dark video, and it is also the easiest one to fix.
Read Your Histogram and Zebras Before You Record
The $0 fix is to stop guessing and start reading the tools your camera already gives you. Every modern camera, even a phone in manual mode, has a histogram, and it tells you exactly how your exposure is distributed across the image instead of relying on how the screen looks.
On a small screen, a dark shot can look fine, then fall apart on a laptop. The histogram does not lie, and if your highlights pile hard against the left edge, you are underexposed, so fix it before you record.
Zebras are the second tool, and they are basically free insurance. They overlay striped lines on the parts of the frame that are blown out or falling into darkness, and learning to read them saved me from delivering a black void to a paying client. If you push a dark clip too far in the edit, it also starts to look grainy, which is its own headache we have covered in our why is my video grainy guide.
Turn the Subject Toward the Light (Free)
Before you buy anything, move the subject. So much dark footage is really just bad placement, a face in a dim corner with a bright window behind it, and no amount of gear fixes that as cleanly as turning the person around.
Put the subject facing the window, close the blinds on the background, and watch the face come to life. This costs zero dollars and works with any camera, including the phone in your pocket, and it is the fastest way to get a properly exposed interview.
I used this exact trick on a quick talking-head video shot in a friend’s living room with nothing but a north-facing window. We moved the chair three feet and the skin tones went from muddy to clean, and the whole setup took four minutes.
The Cheap Bounce: A Reflector Beats More Gear
When the window is on one side and the subject is facing the other, a reflector is the cheapest real fix you can buy. The NEEWER 43 inch 5 in 1 reflector folds flat, has white, silver, gold, translucent, and black sides, and bounces whatever light exists into the shadow side of the face for around $32.
White gives a soft natural bounce, silver adds punch when you need it, and the black side is handy for cutting stray light. It does not create light, it redirects it, which is perfect for window-lit shots and for adding life to a face half in shadow.
This is the kind of tool that makes you look like you know what you are doing for almost no money. I keep one folded in my kit for nearly every interview I shoot, and it has saved more flat, dark shots than any other single accessory I own.
Real Light: A Bi-Color LED Panel When You Need Control
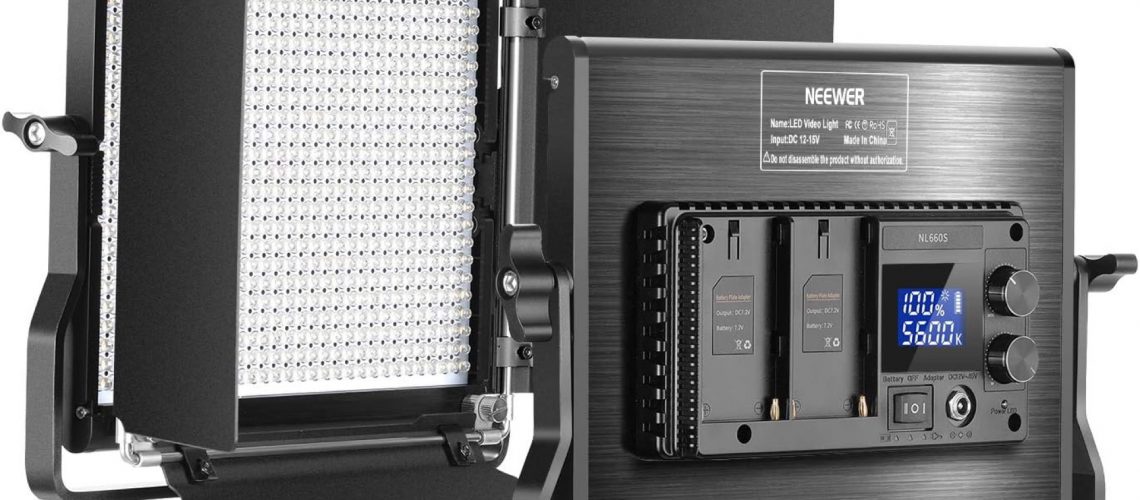
When natural light runs out, or you need control the window cannot give you, a small bi-color LED panel is the answer. The NEEWER 660 LED panel is dimmable, switches between warm 3200K and daylight 5600K, and runs around $119, a fraction of a real light kit.
Point it at the subject, feather it so it wraps instead of slamming them, and set the color to match your window so you avoid a blue face in a warm room. It plugs into a normal outlet, so you can light a whole interview in a hotel room or a spare bedroom without any studio.
Bi-color is the move because it matches whatever light you already have. I have lit entire client interviews with a single one of these panels bounced off a white wall, and the result looked like I brought a grip truck.
Salvaging Dark Footage in DaVinci Resolve
If you already shot it dark, DaVinci Resolve’s free version is the best tool in the world for a rescue attempt. In the color page, you can lift your exposure, recover some shadow detail, and grade your way back toward something usable, but there is a hard limit: you cannot create detail the sensor never captured.
Pushing a muddy, underexposed clip hard in post adds noise and can make the image fall apart. The honest rule is that Resolve fixes minor underexposure, like a slightly flat interview, but a truly black frame stays black.
So use Resolve as a safety net, not a plan. Get it right in camera with a histogram, and let post work polish what you already nailed, which is the difference between footage that survives and footage that just gets darker.
Frequently Asked Questions
Why is my video dark on my phone but fine on the computer?
Your phone screen is often brighter than a monitor, so a slightly dark clip can look fine in the viewfinder and too dark later. Trust the histogram, not the screen, and set the screen brightness close to a normal monitor.
Is underexposure better than overexposure?
Neither is good, but you can usually recover a little more from an overexposed shot because highlight data is easier to pull back than shadow noise. That is why many shooters expose to the right, keeping highlights just off the edge, but that is an advanced habit you should test on your own camera.
Do I need to buy a light to fix dark video?
No. Moving toward a window and using a cheap reflector fixes most beginner dark-video problems for under $35. Buy an LED panel only when you need control at night or in rooms with no usable natural light.
Can editing software truly fix underexposed video?
Only up to a point. DaVinci Resolve can lift minor underexposure and recover shadows, but a heavily underexposed clip gets noisy and falls apart. Capture the exposure in camera and use post as a polish, not a repair.
What is the best exposure setting for interviews?
Start with your camera’s base ISO, set your shutter to double your frame rate, and use the histogram to place your highlights. Then shape the light with a reflector or panel until the face is clean and the background does not blow out.
The Move
Stop fighting dark footage and start controlling it. Read the histogram, turn your subject toward the light, and add a reflector or a small LED panel when the room runs out of options.
Go grab your camera and shoot one test clip of a face near a window, then pull it up on a laptop and look at what exposure actually does. That one experiment will teach you more than any article. If you want to build out a full lighting setup on a budget, our affordable lighting setup guide walks you through the whole rig.
I remember a night shoot where I had one tiny LED panel, a rented camera, and a client who needed a promo by morning, and the footage looked better than jobs I have seen lit with three times the gear. The difference was never the lights, it was reading the histogram and putting the light where it mattered, then trusting it.
Now go shoot something. Some links in this post are affiliate links, and if you buy through them I may earn a small commission at no extra cost to you. That helps keep the lights on around here. Thanks, Mark.